We've had a few tantalizing samplings of the first ripe tomatoes over the past weeks, as some Yukon Reds and Early Girl varieties tend to ripen on the early side of summer. However, this week it became tomato season in earnest in our garden, and we need to keep diligent watch for those ripening beauties hanging off the vines and hiding under the cascading leaves waiting to be picked every day. I say keep watch, because our free-roaming hens (in particular Gypsy and Sadie) love to find these tomatoes and take one peck out of them, leaving the rest to rot on the vine. We are trying not to lose too many tomatoes in this way, though we certainly have enough to share and don't really begrudge the hens enjoying a few bites of the bounty (but they are equally happy with tomato compost scraps, which is a much better arrangement for us). So now it's Manitoba Reds, Moonglows, Mennonite Oranges, Sungold Cherries, Isis Candies, Peacevines, Sweet Baby Girl Red Cherries, Yellow Pears, Cherokee Purples, Patios, Brandywines, Green Zebras, and loads of Tomatillos that are filling every basket and bowl in our kitchen. Needless to say, meals are centring around tomatoes, as many of these aren't really the sauce or canning variety. We're eating toasted tomato sandwiches, tomato pizza, tomato soup, stuffed tomatoes, salsa fresca, bruschetta, tomato tabbouleh, and today two varieties of tomato pie. Delicious! A rustic savoury free-form tomato tart (with olive oil pie crust, four kinds of colourful heirloom tomatoes, and local goat feta), and an Italian zucchini pie (to which we of course added tomatoes, plus loads of fresh basil, thyme, oregano, and sweet vidalia onions).
Both of these recipes, plus many we have been using during this season are from Simply in Season, a wonderful cookbook that is based around seasonal eating, and celebrates meals made with local ingredients (local for much of North America that is). The recipes have been tested by many kitchens, and sent in from contributers across the country - generally simple, wholegrain, healthful fare that highlights the abundance of each season. Recipes are by name of vegetable (very helpful!) as well as title of recipe. The book also includes short essays, nutritional notes, information about farmers markets and CSAs, food advocacy (food justice, food politics), and other brief commentary from each contributor to accompany their recipe. We have two earlier cookbooks from the same series, Extending the Season, and More With Less Cookbook - also both with many well-worn annotated pages from years of use. For anyone looking for one simple cookbook to encourage you toward more local eating, this is a great one to have close at hand in your kitchen.
Thursday, August 12, 2010
Saturday, August 07, 2010
In our kitchen this weekend...
Many busy hands in our kitchen this weekend...all weekend there have been pots, bowls, collanders, sieves, apple corers, measuring cups, mason jars, and the huge vintage canner, taking over our kitchen counters.
We had a cooking "date" making a huge batch of ratatouille to use up the zucchini that was piling up, and then my partner did most of the other kitchen work this weekend, as I had B&B guests to attend to and a few other projects to finish. He harvested the beans, tomatoes, garlic and basil from the garden, made garlic-dill pickles in the crock, packed kimchi into jars from crock to fridge, halved apricots for freezing, helped process ginger-plum jam, wild apple jelly & apple sauce, trimmed French filet green beans to go into the freezer and for dilly beans, labouriously dryed blueberries in the dehydrator for winter granola (it took 2 days for the berries to dry!), made pesto with fresh basil, and many cups of dried basil, thyme, chives and summery savory in the dehydrator (we're finally making a small dent into our basil patch)...here's a recipe for the vegan pesto we make every year.
Karin's Vegan Pesto
4 cups (packed full) fresh basil leaves
6 cloves garlic, minced
3/4 cup olive oil, or 1/2 cup hemp/flax oil plus 1/4 cup olive oil
5 Tbsp nutritional yeast
1/4 cup sunflower seeds or pine nuts (even pumpkin seeds are great!)
dash of sea salt
1 tsp lemon juice
Blend well in food processor. Freeze in ice cube trays, then store in freezer bags or glass freezer containers for quick use in winter meals! Optional: use fresh cilantro, oregano, or parsley in place of basil (or any combination you like).
Heirloom Tomato Late Summer Salad
4 cups heirloom tomatoes, cut into bite-sized pieces (use assorted colours and sizes)
2 cups cucumbers, cut into bite-sized pieces
1 cup fresh basil, chopped coarsely
2 tsp sea salt
1 Tbsp lemon juice
1 Tbsp hemp oil, or flax oil
2 tsp apple cider vinegar
dash of black pepper
fresh chives, minced
Mix all ingredients together, gently tossing to coat vegetables well with the dressing. Garnish with more fresh basil florets and edible flowers! Easy, and refreshing.
We had a cooking "date" making a huge batch of ratatouille to use up the zucchini that was piling up, and then my partner did most of the other kitchen work this weekend, as I had B&B guests to attend to and a few other projects to finish. He harvested the beans, tomatoes, garlic and basil from the garden, made garlic-dill pickles in the crock, packed kimchi into jars from crock to fridge, halved apricots for freezing, helped process ginger-plum jam, wild apple jelly & apple sauce, trimmed French filet green beans to go into the freezer and for dilly beans, labouriously dryed blueberries in the dehydrator for winter granola (it took 2 days for the berries to dry!), made pesto with fresh basil, and many cups of dried basil, thyme, chives and summery savory in the dehydrator (we're finally making a small dent into our basil patch)...here's a recipe for the vegan pesto we make every year.
Karin's Vegan Pesto
4 cups (packed full) fresh basil leaves
6 cloves garlic, minced
3/4 cup olive oil, or 1/2 cup hemp/flax oil plus 1/4 cup olive oil
5 Tbsp nutritional yeast
1/4 cup sunflower seeds or pine nuts (even pumpkin seeds are great!)
dash of sea salt
1 tsp lemon juice
Blend well in food processor. Freeze in ice cube trays, then store in freezer bags or glass freezer containers for quick use in winter meals! Optional: use fresh cilantro, oregano, or parsley in place of basil (or any combination you like).
Heirloom Tomato Late Summer Salad
4 cups heirloom tomatoes, cut into bite-sized pieces (use assorted colours and sizes)
2 cups cucumbers, cut into bite-sized pieces
1 cup fresh basil, chopped coarsely
2 tsp sea salt
1 Tbsp lemon juice
1 Tbsp hemp oil, or flax oil
2 tsp apple cider vinegar
dash of black pepper
fresh chives, minced
Mix all ingredients together, gently tossing to coat vegetables well with the dressing. Garnish with more fresh basil florets and edible flowers! Easy, and refreshing.
Thursday, August 05, 2010
Little City Farm B&B: 100-Mile food...wood-fired pizza, apricot custard tart, and yogurt-berry parfaits
We had a lovely couple from Ottawa staying at our B&B for their 4th wedding anniversary. They were interested in our wood-fired pizza dinner for the evening, as well as our "100-mile breakfast" option for the morning meal. I decided to do both meals using all locally sourced (within 100-mile radius) ingredients. They also needed the food to be wheat-free, which was fine given that organic spelt flour is grown and milled not far from here - good sources are: Oak Manor Farms, Grassroots Organics EcoFarm, and Laepple Organic Farm! Here's what we served (plus a few photos below):
Wood-fired pizza made with an organic spelt crust, homemade tomato-garlic sauce, loads of fresh garden zucchini, cherry tomatoes, green & purple basil and oregano, shiitake mushrooms from our logs, local organic mozzarella from Millbank Cheese
Tomato-cucumber salad with fresh chives, basil, sweet onions and green onions from Fertile Ground CSA, topped with edible nasturtium blossoms, Hempola hemp oil and Filsingers apple cider vinegar
For dessert, slices of sweet local organic watermelon from a friend's farm (the first this season!), and individual apricot-blueberry custard tarts (custard made with local organic milk, eggs from our backyard hens, and local maple syrup), baked on a spelt shortbread crust, topped with a dollop of local creme fraiche, a nasturtium and a mint sprig...the fruit was purchased through a local fruit co-op that sources no-spray and organic fruit from Niagara and delivers to this area each week
The 100-mile breakfast included our B&B "signature" yogurt-granola parfait (made with local organic yogurt - usually either Mapleton's or Pinehedge Farms), plus homemade oat-maple-hemp granola, and fresh blueberries and cherries...mmmmm
Sometimes we have faint dreams of opening a bakery or small cafe or tea house, but for now our bed & breakfast is the perfect opportunity to explore our culinary skills, delight in sourcing and showcasing local food, and find creative artful ways to use our burgeoning garden produce. I love the season of edible flowers, so I try to incorporate them where I can (salads, desserts, breakfasts...)
Wood-fired pizza made with an organic spelt crust, homemade tomato-garlic sauce, loads of fresh garden zucchini, cherry tomatoes, green & purple basil and oregano, shiitake mushrooms from our logs, local organic mozzarella from Millbank Cheese
Tomato-cucumber salad with fresh chives, basil, sweet onions and green onions from Fertile Ground CSA, topped with edible nasturtium blossoms, Hempola hemp oil and Filsingers apple cider vinegar
For dessert, slices of sweet local organic watermelon from a friend's farm (the first this season!), and individual apricot-blueberry custard tarts (custard made with local organic milk, eggs from our backyard hens, and local maple syrup), baked on a spelt shortbread crust, topped with a dollop of local creme fraiche, a nasturtium and a mint sprig...the fruit was purchased through a local fruit co-op that sources no-spray and organic fruit from Niagara and delivers to this area each week
The 100-mile breakfast included our B&B "signature" yogurt-granola parfait (made with local organic yogurt - usually either Mapleton's or Pinehedge Farms), plus homemade oat-maple-hemp granola, and fresh blueberries and cherries...mmmmm
Sometimes we have faint dreams of opening a bakery or small cafe or tea house, but for now our bed & breakfast is the perfect opportunity to explore our culinary skills, delight in sourcing and showcasing local food, and find creative artful ways to use our burgeoning garden produce. I love the season of edible flowers, so I try to incorporate them where I can (salads, desserts, breakfasts...)
Monday, August 02, 2010
Staking the wild tomatoes
Our tomatoes have been a wee bit neglected - we love tomatoes and have planted many varieties as usual (probably over-doing it, but there are just so many tantalizing descriptions in the seed catalogues that we can't resist!). So, we have been putting off the staking and tying up of leggy tomato vines, and this weekend it was really overdue to get this job done. Tomatoes have been sprawling out into all our garden paths and impeding anyone trying to pass through, but fortunately, with the assistance of my little helper (who loved the idea of ripping up an old bedsheet into strips for gently tying the plants up), things have been tidied up a little and we can actually see the bounty of ripening beauties that were hidden away under all those leaves. We've even moved some container plantings into the sunny side yard, to completely isolate them from other varieties and gain more growing space. The first to ripen for us this season were again the Yukon Reds (early mid-sized), and next the golden nugget, green zebra, Isis candy (varigated cherry), and orange sungold cherry. I'd say these are all keepers for next year, so hopefully we'll manage to save true seeds of each of these. We've tried to plant the varieties far enough away from each other to avoid natural cross-pollination, but in a backyard garden (even a big one) you can't be sure. Books say that you can plant varieties as close to 10 feet apart (minimum), but you still have various factors like bee pollination and wind movement that will be out of your control.
Fruit processing - apples, blueberries, peaches...
This long weekend found us...collecting apples from our old "wild" apple tree, a tree which we are bringing back into production after many years of neglect. Having pruned it well last year, it is now bearing tasty mid-sized fairly tart apples that are not only good enough for cider, pie and sauce, but not so bad for eating right off the tree as well!...plus, organic blueberries packed into the freezer for winter smoothies...and peaches for canning and a few that have already been made into rustic lattice-topped pies!
Thursday, July 29, 2010
New bicycle tees
A quick new sewing project, just in time for our 2 year old's birthday (one for her, and one for her cousin). Simple "upcycled" t-shirts made of the softest cotton, with the added applique of a wee bicycle complete with safety flag. A huge hit (the shirt went on right over pajamas first thing this morning!) The shirt design was inspired by some wonderful crafters I found on etsy. Do a search for "bicycle" on there, and you will find an amazing assortment of art celebrating two wheels - notecards, t-shirts, stickers, notebooks, pins, bags, prints, fabric, pillows, etc etc...
End of July homesteading tasks...plus herbal iced teas and fruit sodas...
Happy late July! We can't believe that summer is half way over...it feels like it's just now coming to it's peak. Our garden has become a jungle and days right now are full with tending to it, plus canning peaches, preserving jam, drying berries, making crock pickles with fresh cucumbers and dill, baking outside in the wood oven, harvesting our first ripe heirloom tomatoes & our favourite French filet beans, collecting seeds, wheeling mulch into our garden paths, weeding, drying tea herbs, watching bees, chasing the hens out of the garden (one has made a nest under our asparagus patch and needs to get in there to lay her egg each day!), picking edible flowers to decorate cakes...some breaks for homemade berry soda and herbal iced tea, a few jaunts off the property for some swimming to cool off, and of course lots of playing in the sand pile with our 2 year old...
Favourite Herbal Iced Teas & Fruit Sodas:
Make a strong herbal tea with 2 cups water plus large handfull of herbs. Steep with water that has just boiled for at least 15 minutes, or for sun tea soak herbs in cool water in large glass jar for several hours in direct sunlight. Add honey or sugar to sweeten. Fill glasses with ice, add herbal tea, plus sparkling water if desired, plus fresh berries (raspberries, blueberries), peach slices, or lemon and lime rounds. Add a sprig of mint or nasturtium to the glass and you have a gourmet art piece. Delicious!
our favourite blends:
* anise hyssop, red clover, lemon balm
* bergamot blossoms, mint and lemon verbena
* lavender, honey and lemon
Another variation is to make a strong tea, mix it half and half with pure fruit juice (e.g. mango, blueberry, peach, raspberry, blackberry, pear), plus crushed ice and a dash of sparkling mineral water, for an amazing simple and refreshing healthful fruit soda.
Favourite Herbal Iced Teas & Fruit Sodas:
Make a strong herbal tea with 2 cups water plus large handfull of herbs. Steep with water that has just boiled for at least 15 minutes, or for sun tea soak herbs in cool water in large glass jar for several hours in direct sunlight. Add honey or sugar to sweeten. Fill glasses with ice, add herbal tea, plus sparkling water if desired, plus fresh berries (raspberries, blueberries), peach slices, or lemon and lime rounds. Add a sprig of mint or nasturtium to the glass and you have a gourmet art piece. Delicious!
our favourite blends:
* anise hyssop, red clover, lemon balm
* bergamot blossoms, mint and lemon verbena
* lavender, honey and lemon
Another variation is to make a strong tea, mix it half and half with pure fruit juice (e.g. mango, blueberry, peach, raspberry, blackberry, pear), plus crushed ice and a dash of sparkling mineral water, for an amazing simple and refreshing healthful fruit soda.
Wednesday, July 28, 2010
Chicken love
Here are ten reasons we love having hens at our little urban farm:
1) manure - chicken manure hugely benefits our gardens
2) permaculture - closed loop permaculture principle (i.e. hens eat compost scraps, turn it into manure, back onto the garden, grow more veggies, which we use in the house and compost goes back to the hens - and the cycle begins again)
3) companionship - hens make loyal companions and are incredibly social birds
4) pest control - hens are excellent fly, mosquito, snail, slug and earwig catchers
5) soil health - hens help till up our soil while scratching for bugs
6) eggs - wonderful omega-rich eggs provided every day!
7) new skills - teaching our children animal husbandry skills (feeding, cleaning, watering, animal care)
8) earth connection - greater connection to the rhythms of nature and cycles of life
9) entertainment and fun - hours can be spent watching the constant antics of our hens
10) food security - adding our small part to develop greater food security for our urban areas
Sunday, July 18, 2010
Mid-July garden going to seed
Seed pods are works of art. They are so beautiful shooting upward or nodding low in the garden paths, dusting off when you brush by or floating away with a strong breeze, perfect, compact, and with all the potential in them to start the next generation of hardy plants for another garden season...already, now in mid-July, various plants are at seed stage in our garden and here is a sampling of what I saw yesterday. We try to collect many of these to use next year (e.g. lettuces, spinach, kale, chard, peas, beans, tomatoes, cucumbers, basil, coriander, and many herb varieties), to give away, or to broadcast back into the beds as we slowly develop our permaculture self-perpetuating gardens...
Pictured here - sorrel, purple ruffles basil, chives, lettuce, dock, plantain.
New garden projects & the family hammock
We've been working on the side yard (former construction site while our straw bale addition to the house was being worked on), and have slowly started to map out what this new section of the property will look like - new keyhole garden beds, a large area to expand our lavender production, map out where another fruit tree or two can be planted, perhaps a new bicycle shed/wood shed for easier access, and a winding path of flagstone throughout, and a little patch of lawn (well, clover, grass and wildflower seeds interplanted) with just enough room to put down a picnic blanket, kids playing, and setting up a small tent for hot summer nights. It's exciting to have this whole new area plot of land to dream about - little by little this property takes shape.
And, after the busy weekend, we spent some time relaxing in our favourite spot on the back porch, the family-sized hammock!
Solar cooking/drying workshop
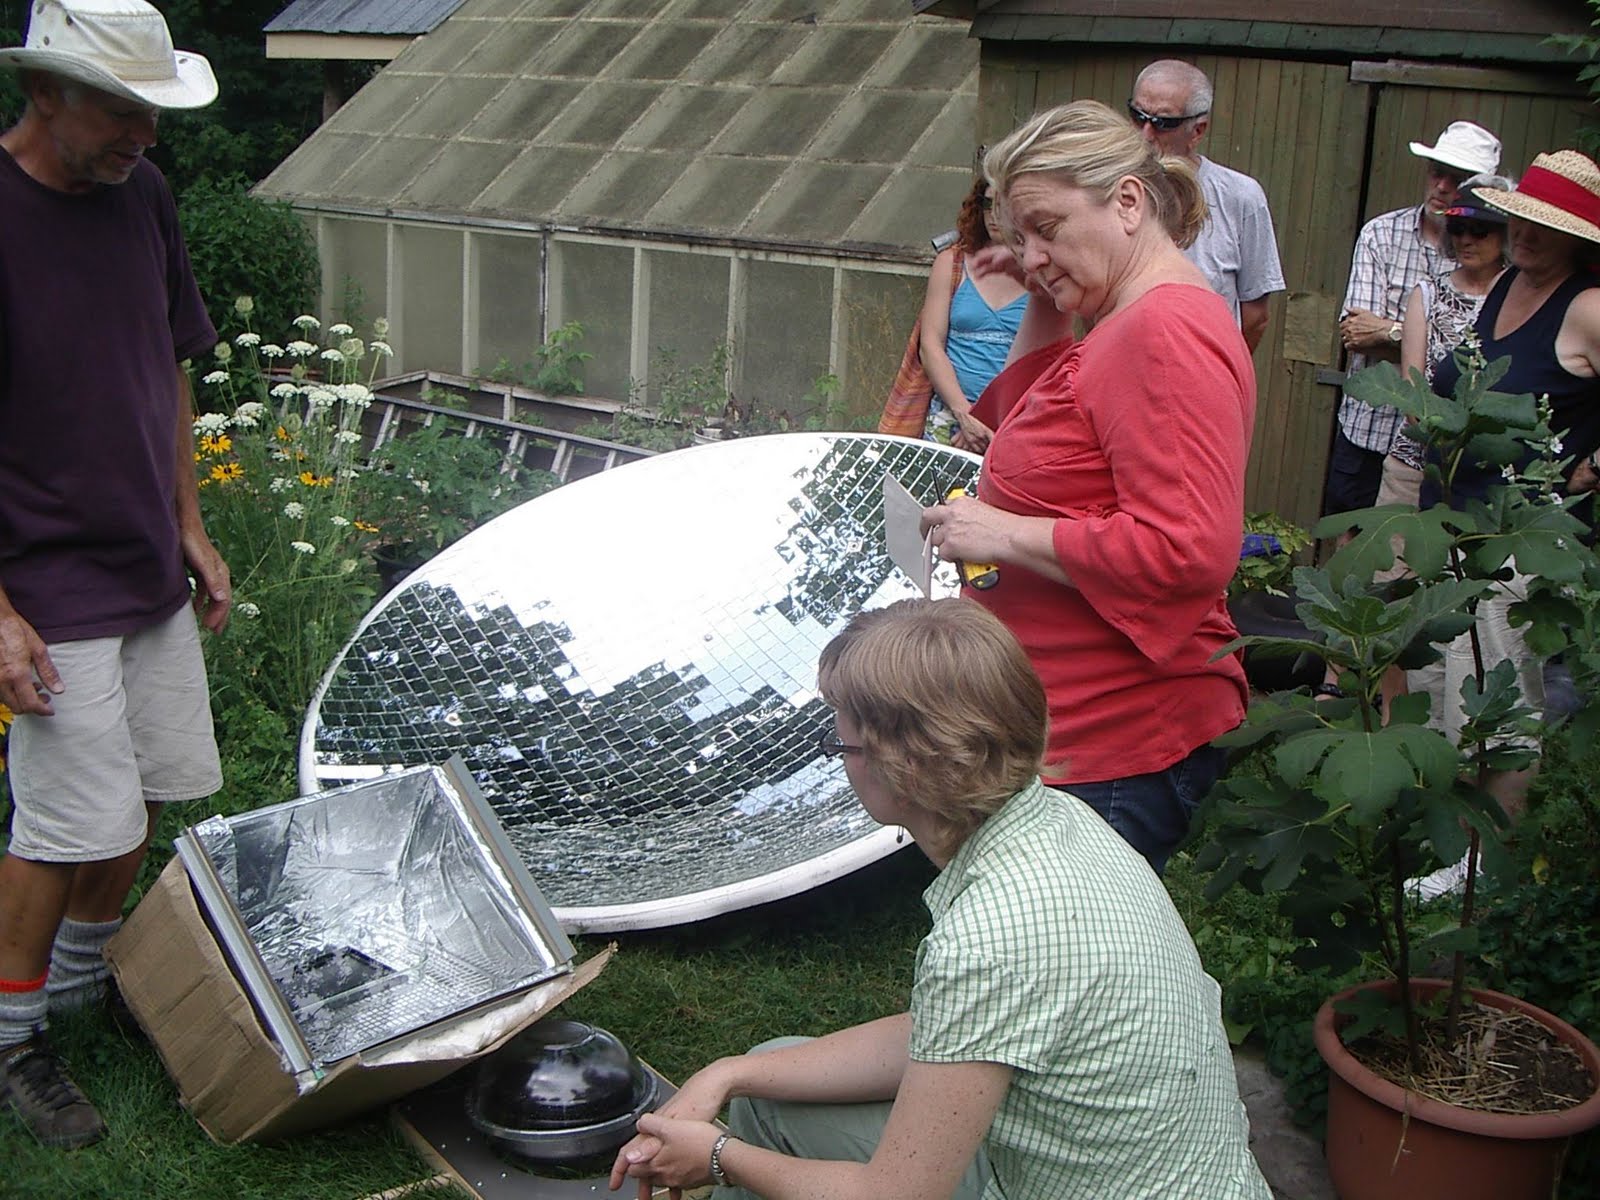
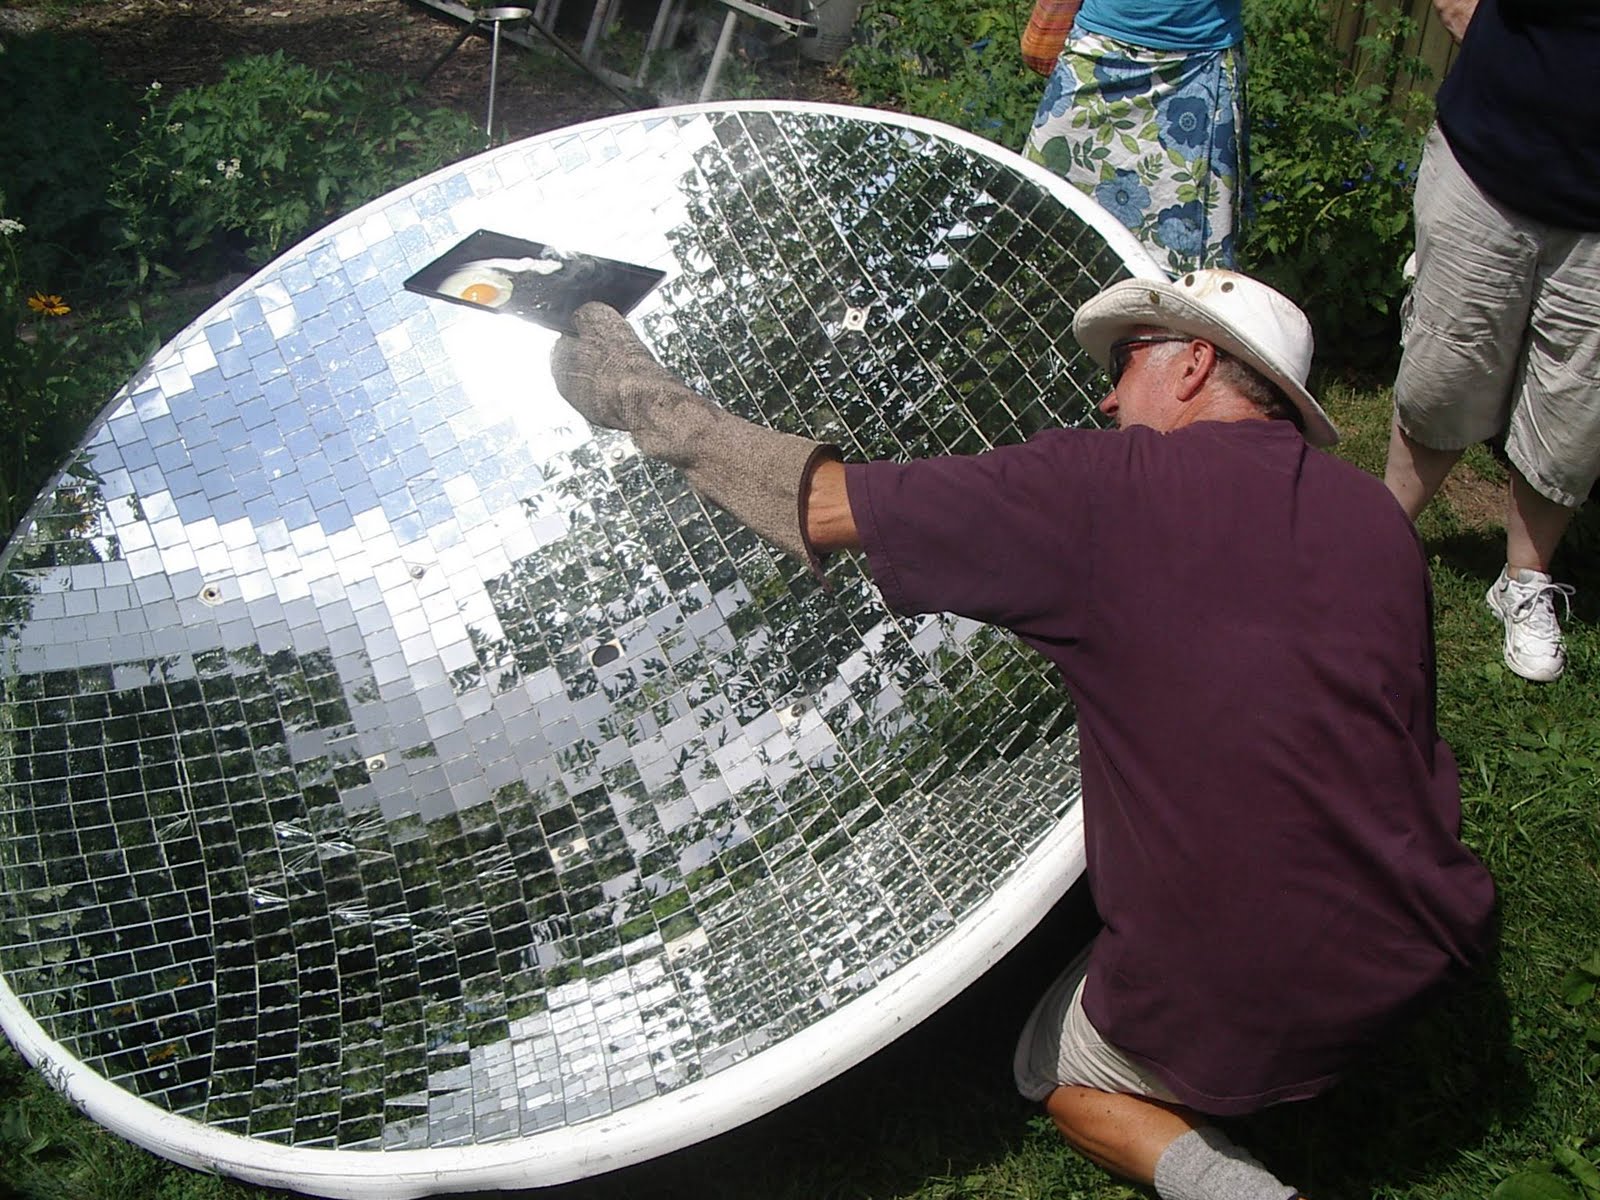
Yesterday we hosted a short workshop on solar cooking/drying. Our guest facilitator had spent time ahead of the workshop building various models that were home-scale size, made of inexpensive materials and simple construction. The idea was to give participants an idea of the range of possibilities, inspire creative thinking and experimentation (and tinkering), and make solar cooking feel like something easily accessible to a wide range of people. There are so many books out there about solar cooking, and it really seems like a topic with few difinitive answers - there are so many variables, such as climate, sun exposure, time of year, humidity, what you are cooking/drying, etc. He had made a solar dryer, using wire cooling racks (used for baking) as his screens, with wooden frames built around the screens to fit snugly. The bottom was painted black, the top had plexiglass sheeting to trap heat. This dryer box could be used for drying herbs, fruits, vegetables. As well, there were several examples of simple solar ovens to demonstrate cooking and baking (for vegetables, soups, breads, etc) - including a foil-lined box cooker and a solar collector dish. By the time we got to this stage in the workshop we were running short on time, so all we had time to cook was an egg - but this was done in an astounding matter of seconds using a cast iron frying pan held directly over the solar dish (note - while wearing sunglasses and long protective gloves!) The solar collector dish was tilted toward the sun, reflecting several hundred watts off it's mirrored surface! The idea was that a roasting pot or other cooker could be rigged up on a frame over this solar dish. You would have to keep this solar dish covered with a tarp when not in use, as it would easily be a potential fire hazard! Needless to say, this was an interesting introductory workshop that peaked more questions...
Thursday, July 15, 2010
Homesteading tasks - making applesauce
A portion of this morning was spent cutting up apples for our first fresh homemade applesauce of this season. We had been gifted with a bushel of newly picked apples from our friend's farm. Turns out these are real old-fashioned baking apples from a very old tree, tart and a little dry for eating, but perfect for saucing or baking into pies - the batch transformed quickly (in less than 30 minutes) into a smooth creamy rich sauce. You can't find apples like this at the store, that's for sure! Our little one couldn't help but try a bite out of apple after apple, putting each one down with another look of disappointment on her face at the unexpected sourness of the flavour - I guess having a whole bushel of gleaming apples standing on the floor was just too
irresistable. She was amazed at how the flavour changed into delicious sauce, after the apples cooked down.
Here are a few simple techniques for making perfect homemade applesauce to you liking:
Method A) Quarter, core and chop apples, including skins. Place in large pot with enough water to cover the bottom. Bring to a boil, stirring frequently, and then simmer on reduced heat until softened. Check to ensure the sauce does not burn on the bottom, stirring occasionally and adding a little more water if necessary. Sauce can be pureed in food processor or food mill if you want a uniformly smooth texture. Optional, add sugar or other sweetener, and/or cinnamon.
Method B) Using an apple coring device, peel and core apples. Then chop into smaller sections. Follow above directions for cooking down into sauce. This sauce, without skins, creates a slightly smoother texture.
Method C) Quarter and chop apples, but do not take the time to core them. Follow directions for cooking down into sauce. Then, using a food strainer, or apple sauce sieve, strain the sauce through the mesh and compost the seeds/peels.
irresistable. She was amazed at how the flavour changed into delicious sauce, after the apples cooked down.
Here are a few simple techniques for making perfect homemade applesauce to you liking:
Method A) Quarter, core and chop apples, including skins. Place in large pot with enough water to cover the bottom. Bring to a boil, stirring frequently, and then simmer on reduced heat until softened. Check to ensure the sauce does not burn on the bottom, stirring occasionally and adding a little more water if necessary. Sauce can be pureed in food processor or food mill if you want a uniformly smooth texture. Optional, add sugar or other sweetener, and/or cinnamon.
Method B) Using an apple coring device, peel and core apples. Then chop into smaller sections. Follow above directions for cooking down into sauce. This sauce, without skins, creates a slightly smoother texture.
Method C) Quarter and chop apples, but do not take the time to core them. Follow directions for cooking down into sauce. Then, using a food strainer, or apple sauce sieve, strain the sauce through the mesh and compost the seeds/peels.
Wednesday, July 14, 2010
Herb harvesting
Our greenhouse has turned into a solar herb drying facility - we've hung up a tarp to block out the sunlight, and have converted our shelving into herb drying racks, plus a long series of hooks for herb bunches to hang from the rafters. Herbs dry quickly in here, as it's dark, breezy and very dry in the greenhouse when the door is left open. I remember volunteering as a WWOOFer one summer about ten years ago up at the Algonquin Tea Company near Ottawa. Interning with the WWOOF program (World Wide Opportunities on Organic Farms) is an excellent opportunity to try out life on a real working farm and do some travelling, with organic farms listed across the globe and as diverse as your interests may be - from sheep farms to biodynamic dairy farms, to herb farms, to farms with working draft horses, to market gardens and large-scale CSA's, there is bound to be a farm in the WWOOFing guide that suits your needs. The experience at Algonquin Tea was probably one of my biggest inspirations for delving further into the world of herbalism and wild foods. They had converted an old barn loft into their herb drying studio, with rows and rows of shelving to dry all the plants for the six beautiful loose-lea teas they produce.
For proper herb drying you just need these conditions: pick herbs when at their peak (determine if you are using the leaves, flowers, roots, berries, etc); pick late morning when dry but not too late in the day when they may be wilted from the heat; dry in small hanging bunches with proper air circulation around them, or in paper bags with a few holes punched in as air vents (bags are useful for collecting flowering herbs like lavender which drop their petals while drying); or on racks or old window screens, again with lots of air circulation. They should be dried out of direct sunlight, and when herbs are dried crisp yet still with colour intact, they are ready. Herbs should never be stored if they are not completely dry as they will mold and spoil your whole batch! Today we were harvesting herbs on our property for our teas and salves: bergamot, mints, lemon balm, catnip, lavender, calendula, red clover, anise hyssop, sage, yarrow, plantain, comfrey, oregano, thyme, marshmallow leaf, sweet grass, plus basil and wild grape leaves (to eat).
Tuesday, July 13, 2010
Oregano honey, anyone?
My daughter and I spent a long while yesterday watching (and photographing) a beautiful group of busy bees making their way through our oregano patch. They carefully went looking for pollen in each and every tiny blossom on the plants, hundreds of blossoms for them to visit. I had been complaining about the ever-spreading oregano that's taking over a large section of our herb garden, but here was my answer. I needed to be reminded that all the plants we may be tending have more purpose than just for our own interests, and these bees were obviously very happy to have found this oregano abundance! I searched online for oregano honey, and there is quite a niche in the health food market promoting wild oregano and garden oregano honey as a health tonic - beneficial for healing coughs, colds, flu, bronchitis, arthritis, and it's antioxidant properties.
Speaking of bees, here is a link to an interesting project in New York City called the Great Pollinator Project. They list information on how to become a "bee watcher", a land manager, or participate in other ways to increase the abundance of bees in urban areas. They write that 1/3 of our food depends on the services of a pollinator (bee, other insect, bird, or mammal). Increasing the diversity in our gardens with pollinator-attracting plants and blooms, plus water features like ponds, is incredibly important for food security.
Saturday, July 10, 2010
New comfrey healing salve
Just finished a custom order of a pure comfrey healing salve - but it turned out to be such a beautiful salve that I think this is one I'm going to keep making in my regular line-up of herbal items for Homestead Herbals. Comfrey has been used for generations to heal all manner of skin conditions, from eczema, to cuts, scrapes, burns and bruises. It is also known as "knit bone" from it's reputed ability to help heal broken bones and sprains when applied regularily as a poultice. It's somewhat of a wonder plant, and should be part of every urban garden (both for it's medicinal uses and also it's benefits to the compost pile, making compost tea, etc). It grows wild in many urban areas and although it is often overlooked as a common weed, it should be given due respect. Generally this plant is only to be used externally as there is some controversy among herbalists and other health practitioners about it's safety when taken internally.
Making kombucha - the "elixir of long life"
This past week we had guests from an urban farm in Ottawa staying with us at our bed and breakfast. They said for them it was like "coming home", and we too thoroughly enjoyed their company and had long conversations about permaculture, cohousing, land trusts, food co-ops, and lacto-fermenting foods. They shared their home-brewed kombucha with us and left a bottle so we could get our own batch started! Kombucha is a wonder drink, known by some as "the elixir of long life" because it is full of antioxidants and probiotics (along the lines of kefir, live culture yogurt, kimchi, etc). It promotes healthy intestinal flora, stimulates the immune system, boosts energy levels, and has been reputed to heal a long list of health issues by detoxifying and cleansing the blood/body.
We had been talking about starting kombucha after reading about it in the Wild Fermentation book, so I was extremely pleased to receive this gift! Hopefully, if all goes well, in several weeks we will have a "mother" mushroom which we can pass on to others who want to start their own brews.
Here's a recipe for making your own kombucha at home. It's also readily available in various flavours from health food stores. I have not found information yet about whether kombucha can successfully be made without using refined sugar - this is one down side of this drink, as it does contain a fair amount of sugar sweetener, but the sugar is needed (as in wine making) for the microbes to multiply and assist fermentation.
Kombucha
1) Get some live kombucha (e.g. if you don't have someone to give you a starter culture, they can be purchased online, or you can use 1/2 cup from a kombucha tea you buy at the health food store)
2) Steep 4-8 tea bags (black or green, not herbal) per 4 litres (aprox 1 gallon) water. Tea can be made with cold filtered water and let tea bags steep until tea is desired strength; or make a hot tea and let it cool before adding starter culture.
3) Add 1-1/2 cups sugar, which helps fuel the kombucha microbes (the more sugar, the stronger the sour flavour will be in your finished kombucha).
4) Add kombucha starter culture, or the 1/2 cup kombucha tea from your last batch or store bought bottle.
5) Stir well, then cover with cheese cloth - securing cover so flies can't get in, but allowing kombucha to breathe.
6) Let sit for one week (or more) on kitchen counter - if "mushroom" grows it has worked. Save mushroom ("mother") and use to float in your next batch of kombucha. In another week or so the mushroom will grow another small mushroom on it, which can be saved and used, or given away!
7) Bottle kombucha (siphon into glass jars) and store in the fridge. At the point of bottling, you can add various interesting flavour additives such as chopped ginger root, raspberries, or lemon slices, into each bottle. The finished kombucha will taste like a fizzy carbonated sour-sweet iced tea drink. Drink 1/2 cup each day for health benefits.
We had been talking about starting kombucha after reading about it in the Wild Fermentation book, so I was extremely pleased to receive this gift! Hopefully, if all goes well, in several weeks we will have a "mother" mushroom which we can pass on to others who want to start their own brews.
Here's a recipe for making your own kombucha at home. It's also readily available in various flavours from health food stores. I have not found information yet about whether kombucha can successfully be made without using refined sugar - this is one down side of this drink, as it does contain a fair amount of sugar sweetener, but the sugar is needed (as in wine making) for the microbes to multiply and assist fermentation.
Kombucha
1) Get some live kombucha (e.g. if you don't have someone to give you a starter culture, they can be purchased online, or you can use 1/2 cup from a kombucha tea you buy at the health food store)
2) Steep 4-8 tea bags (black or green, not herbal) per 4 litres (aprox 1 gallon) water. Tea can be made with cold filtered water and let tea bags steep until tea is desired strength; or make a hot tea and let it cool before adding starter culture.
3) Add 1-1/2 cups sugar, which helps fuel the kombucha microbes (the more sugar, the stronger the sour flavour will be in your finished kombucha).
4) Add kombucha starter culture, or the 1/2 cup kombucha tea from your last batch or store bought bottle.
5) Stir well, then cover with cheese cloth - securing cover so flies can't get in, but allowing kombucha to breathe.
6) Let sit for one week (or more) on kitchen counter - if "mushroom" grows it has worked. Save mushroom ("mother") and use to float in your next batch of kombucha. In another week or so the mushroom will grow another small mushroom on it, which can be saved and used, or given away!
7) Bottle kombucha (siphon into glass jars) and store in the fridge. At the point of bottling, you can add various interesting flavour additives such as chopped ginger root, raspberries, or lemon slices, into each bottle. The finished kombucha will taste like a fizzy carbonated sour-sweet iced tea drink. Drink 1/2 cup each day for health benefits.
Beautiful garden blossoms - mid July colours at Little City Farm
Here's a quick list of the plants in these photos, from top to bottom:
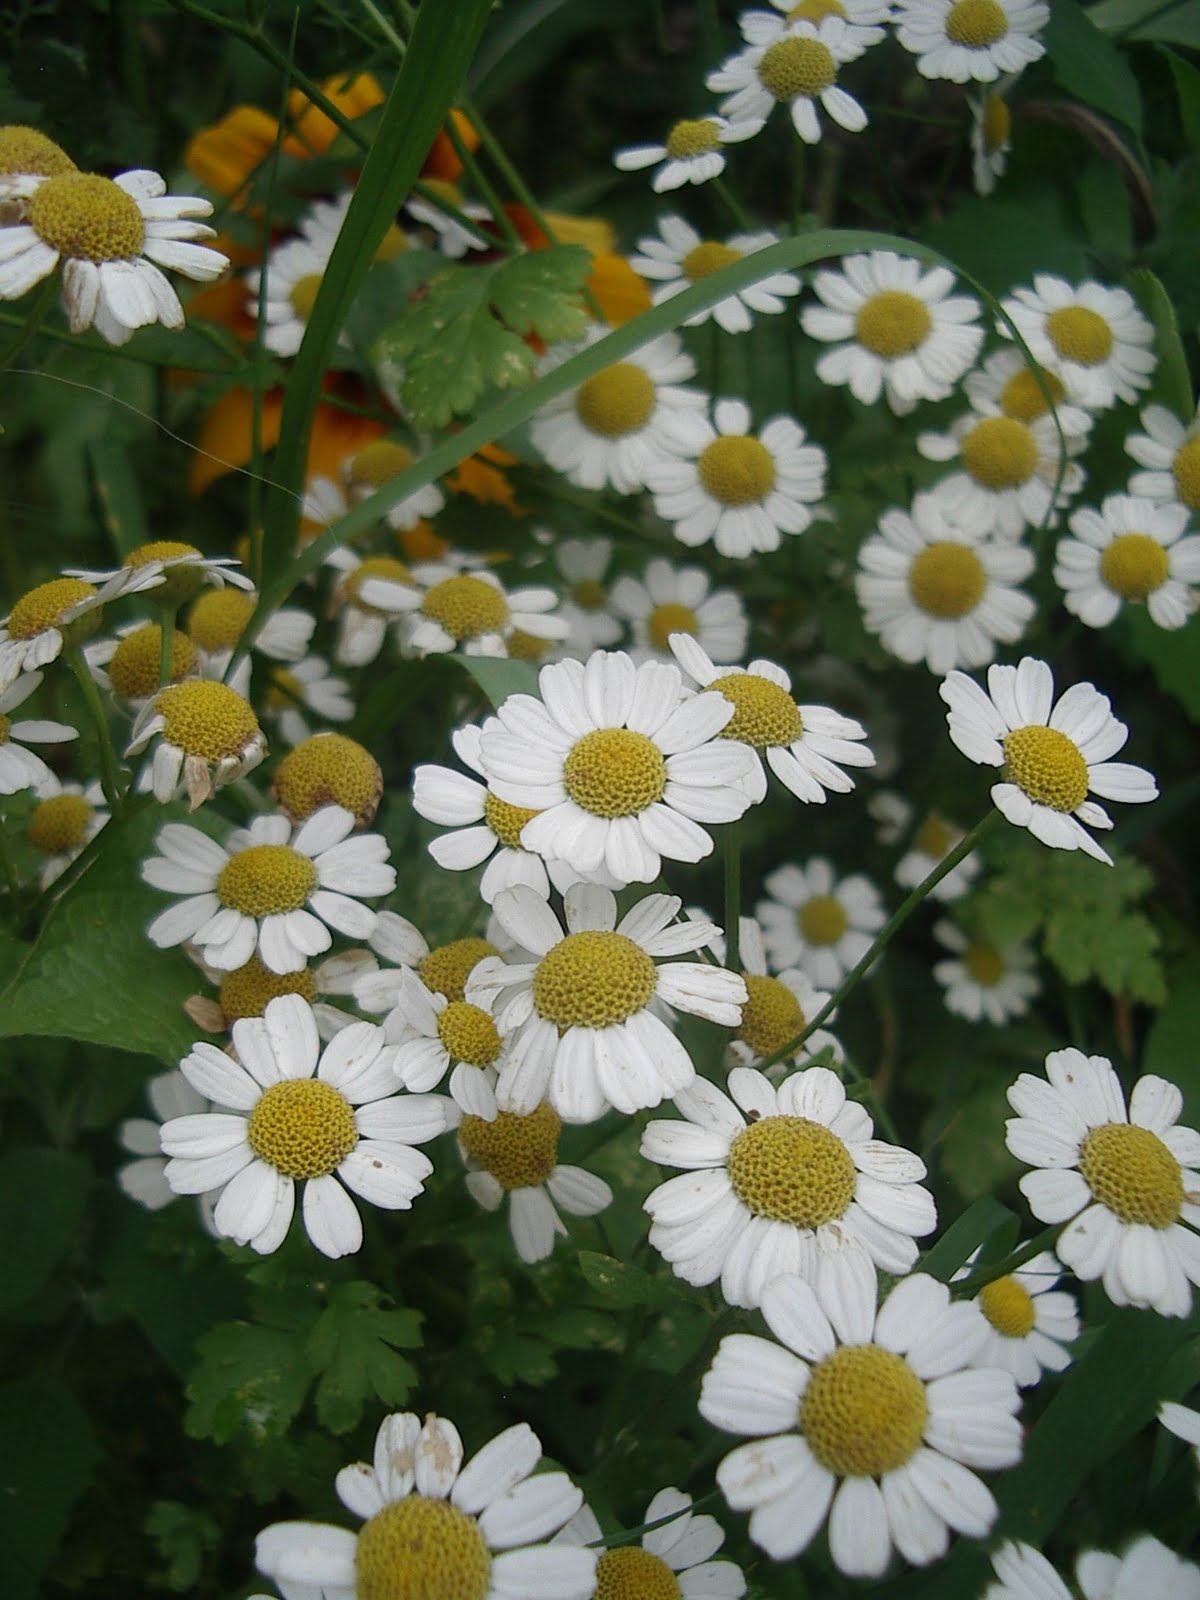
marshmallow, feverfew, echinacea, calendula, green tomatillo, dill, purple basil, lavender, bergamot, black eyed susan, onion, wild bergamot, purple lambs quarters, wood sorrel.
Subscribe to:
Posts (Atom)